UV DTF transfers workflow is transforming how apparel decorators achieve vibrant, durable designs. By pairing UV-curable inks with the DTF printing workflow, brands gain fine detail and strong color on many fabrics. A solid design to garment process helps manage color, substrate compatibility, and print reliability. Following heat transfer best practices ensures longevity across light and dark garments. For teams exploring UV printing on fabrics, this workflow offers crisp results and scalable production.
In LS I terms, this topic can be framed as digital-to-fabric transfers driven by UV-curable inks. Think of it as a film-to-fabric method that bridges design concepts with wearable products. The LS I approach highlights substrate compatibility, color accuracy, and efficient curing for lasting results. By describing the process in varied terms—such as UV printing on fabrics, DTF printing workflow, and heat transfer best practices—you reinforce topic relevance without repeating the same phrase.
Understanding the UV DTF transfers workflow: from concept to garment
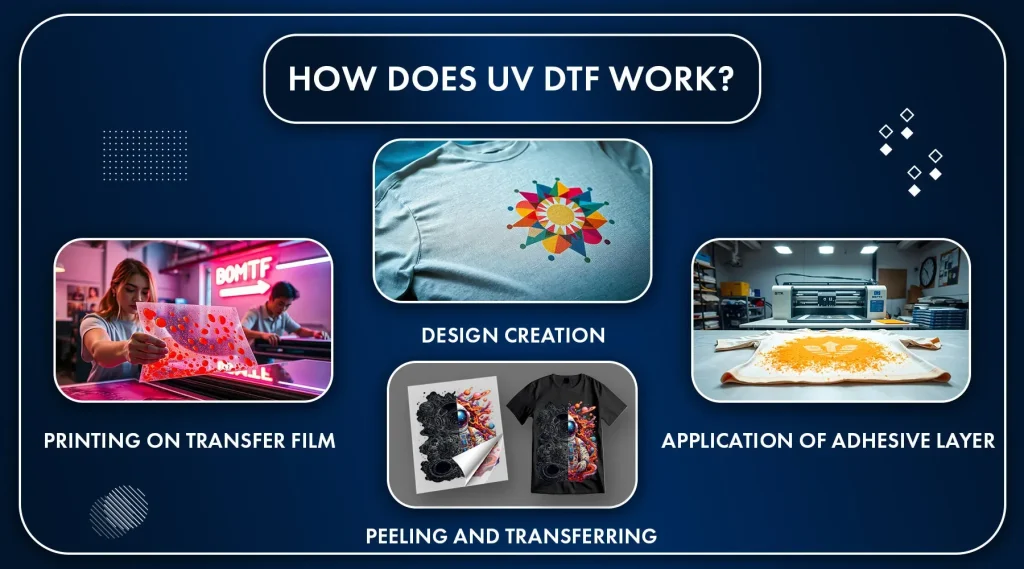
The UV DTF transfers workflow integrates design and production into a single pipeline, from concept to garment. By using UV-curable inks on a DTF film, brands can capture fine detail, smooth gradients, and broad color on both light and dark fabrics. This end-to-end process sits within the broader DTF printing workflow and highlights the importance of color management, substrate selection, and print-to-press alignment in the design to garment process.
Understanding this workflow helps teams plan ink consumption, minimize waste, and predict color outcomes across runs. It also aligns with UV printing on fabrics, enabling consistent results whether you’re decorating cotton tees or polyester blends, while preparing you for production-scale challenges and quality control.
Design and artwork preparation for UV DTF transfers
Design and artwork preparation set the foundation for successful UV DTF transfers. Starting with high-resolution source files and vector artwork helps translate cleanly to film and then to fabric. This stage emphasizes the design to garment process as it maps artwork to print areas, bleed zones, and underbase requirements for dark fabrics.
Color management is essential here; establish ICC profiles for UV-curable inks and verify soft-proofing under target lighting. Plan separations with dedicated white underbase for dark fabrics and ensure legibility of fine text on textiles, all while considering substrate constraints to avoid surprises in production.
Prepress and transfer film preparation for color accuracy in UV DTF transfers workflow
Prepress and transfer film preparation optimize the image before it ever reaches the press. Mirror the artwork when necessary, plan the white underbase, and run small proofs to check color balance. This stage minimizes misalignment and color drift in the UV DTF transfers workflow and supports reliable outcomes in the design to garment process.
Handling and file integrity also matter: keep the workspace clean to avoid dust on the film, manage anti-static measures, and ensure all fonts and linked images are ready (convert fonts to outlines if needed). Proper prepress reduces rework and helps maintain consistency across batches of UV printing on fabrics.
Printing with UV-curable inks on the transfer film: optimizing the UV DTF workflow
Printing with UV-curable inks on the transfer film is the core of the process. Calibrate the printer with the recommended ICC profile and use high-resolution print settings to maximize detail and color accuracy. The UV DTF transfers workflow benefits from controlled white underbase application and consistent ink flow on the film to support vibrant color and sharp edges.
Monitor drying behavior and curing requirements for UV inks; some films require a post-print cure to reduce tack. Keep the film flat during printing and avoid curling by using suitable mounting or lamination constructs. This ensures uniform thickness and edge-to-edge sharpness when the transfer is applied to fabric.
Powdering, curing, and the transfer phase: optimizing adhesion and edge quality
Powdering and curing are critical for bond strength and clean edges. Apply a uniform adhesive powder over the printed film, then remove excess powder to prevent specks on the final garment. Pre- or post-cure the powder as recommended by the system to lock the adhesion before the transfer step.
The transfer phase then uses precise heat and pressure, with typical ranges around 160–180°C for 10–20 seconds, applying medium to firm pressure. Cushioning, substrate support, and a brief pre-press help ensure even contact and reduce edge distortion, while ensuring proper white underbase density on dark fabrics for vibrant color. Adhere to heat transfer best practices by calibrating dwell time and pressure and using proper post-press handling.
Post-press finishing, care guidelines, and ongoing optimization for UV printing on fabrics
Post-press finishing and care guidelines close the loop for UV printing on fabrics. Inspect for misprints, ensure any required post-press cure is completed, and package garments with appropriate care instructions to protect the transfer. Proper finishing also considers sustainability, waste reduction, and disposal of consumables in line with best practices for UV DTF transfers.
Ongoing optimization includes documenting substrate-specific settings, pursuing sustainability by reclaiming unused film and powder, and providing customers with wash care guidance. This completes the UV DTF transfers workflow by supporting long-term durability and consistent results across runs, aligning with DT F printing workflow principles and the design to garment process.
Frequently Asked Questions
What is the UV DTF transfers workflow and why is it advantageous for fabric decoration?
The UV DTF transfers workflow is the end-to-end process from concept to wearable product that uses UV-curable inks on a DTF film, followed by a heat-transfer step. It delivers crisp detail, a wide color gamut, strong color on light and dark garments, and good adhesion across fabrics like cotton and poly blends. A structured workflow—covering design, color management, substrate selection, print settings, and finishing—helps you achieve consistent, high-quality results.
In the UV DTF transfers workflow, what design considerations matter most in the design to garment process?
Key design considerations include starting with high‑resolution artwork (prefer vectors), establishing a color-managed pipeline with ICC profiles, planning separations and a white underbase for dark fabrics, and including bleed and safe zones. Ensure readability on textiles and design with the garment substrate in mind—the principles of the design to garment process in the UV DTF transfers workflow help preserve color brightness and detail after transfer.
What should you focus on during prepress in the UV DTF transfers workflow?
During prepress, mirror the artwork for the transfer film, plan the white underbase for dark garments, and run small proofs to validate color balance. Maintain file integrity by converting fonts and removing missing links, and keep the workspace clean to minimize dust on the film.
What are best practices for printing with UV-curable inks in the UV DTF transfers workflow?
Calibrate the printer with the recommended ICC profile for UV-curable inks and your film, and print at high resolution (2400–2880 dpi) to maximize detail. Print the white underbase first if used, ensure proper curing of the ink on the film, and keep the film flat to avoid distortion during transfer.
What is the recommended heat press protocol in the UV DTF transfers workflow?
Use a brief pre‑press to remove moisture (2–5 seconds), then transfer at about 160–180°C (320–356°F) for 10–20 seconds with medium to firm pressure. Use a stable surface and a silicone cover sheet if needed, and allow the garment to cool slightly before peeling to prevent edge lifting.
How can you troubleshoot common issues in the UV DTF transfers workflow?
Common issues include color misalignment, fading after washing, and edges lifting. Revisit color management and ICC profiles, verify proper curing and care instructions, ensure even powder application and correct transfer film, and rework white underbase coverage or pressing parameters as needed.
| Aspect | Key Points |
|---|---|
| Overview | UV DTF transfers fuse UV-curable inks with Direct-to-Film (DTF) transfer to apply designs to fabric, enabling vibrant, durable prints across many fabrics. |
| Benefits and Rationale | – Crisp detail and smooth gradients – Wide color gamut and strong color brightness on light and dark garments – Good adhesion on cotton, poly blends, and certain synthetics – Flexible workflow from design to finished garment |
| Complete Workflow | From design to finished garment, with attention to color management, substrate selection, print settings, heat pressing, and finishing to ensure consistency and high quality. |
| Core Elements | Design integrity, color management, substrate compatibility, print quality, adhesive behavior, curing, and finishing. Alignment across all steps yields consistent results. |
| Step 1 – Design & Artwork Prep | High-resolution artwork; vector preferred; color-managed pipeline with ICC profiles; layer separation for CMYK/underbase; bleed/safe zones; consider garment color and fabric when planning. |
| Step 2 – Prepress & Film Prep | Mirror the artwork for reverse printing; plan white underbase for dark fabrics; color checks with proofs; handle material carefully to avoid dust; ensure fonts/images are intact. |
| Step 3 – Printing (UV-curable on film) | Calibrate printer with ICC profile; use high-res settings (2400–2880 dpi); print dense white underbase when needed; manage UV curing and post-print twist; keep film flat. |
| Step 4 – Powdering & Curing | Apply uniform adhesive powder; remove excess powder; pre-cure as needed; use powder compatible with UV inks; ensures clean edges and strong adhesion. |
| Step 5 – Transfer Process | Control temperature (e.g., 160–180°C/320–356°F) and dwell time (10–20s); moderate to firm pressure; ensure flat, supported substrate; pre-press, then post-press cool-down; dark fabrics require solid underbase. |
| Step 6 – Post-press & Care | Inspect for defects; post-press cure if required; package with care instructions; provide fabric care guidance to maximize durability. |
| Troubleshooting & Optimization | Address color drift with ICCs and proofs; check curing and wash performance; fix lift/ghosting by adjusting pressure, temp, dwell; ensure underbase density and film quality are correct. |