DIY UV DTF Transfer is a creative pathway from a digital idea to wearable art, merging precision UV technology with hands-on craft. For hobbyists and small brands alike, this approach blends DTF transfer techniques with UV printing on fabric to deliver sharp detail, bright colors, and durable results. The appeal lies in a flexible DIY workflow that keeps costs down while letting you explore heat transfer printing, maintain control over color, and test designs before committing to larger runs. When compared to DTG vs DTF or traditional methods, DIY UV DTF Transfer offers faster curing and a softer handfeel on many fabrics, helping your designs become truly wearable art. Whether you’re printing on tees, totes, or bags, this guide helps you navigate materials, setup, and best practices to achieve studio-quality results at home.
Alternative terms for this method include direct-to-film (DTF) transfer and UV-curable fabric printing, which describe the same process from design to wearable piece. You can think of it as UV-printed film transfers applied to textiles, or as a fabric-ready artwork created through a digital-to-fabric pipeline. This LSI-friendly framing enhances discoverability by linking related concepts such as heat transfer printing, wearable decoration, and modern textile DIY. It reinforces the idea of turning digital designs into durable, vibrant apparel.
DIY UV DTF Transfer: A Modern Path from Digital Design to Wearable Art
DIY UV DTF Transfer is not just a technique; it’s a creative pathway from a digital concept to wearable art. By combining Direct-to-Film printing with UV-curable inks, designers can move quickly from a sketch to a production-ready transfer that adheres to T-shirts, tote bags, and other fabrics. This approach is well-suited for hobbyists, small apparel brands, and makers who want studio-quality detail at home, without a heavy equipment investment. The result is crisp edges, bold color, and a soft handfeel that keeps artwork legible through regular wear.
Compared with traditional heat transfer printing, UV DTF offers faster curing, higher color fidelity, and more reliable reproduction of fine lines and gradients. The UV-curable film captures subtle shading and photographic detail, helping your design stay true to the original concept after transfer. This guide frames the DIY workflow in terms of practical steps, material choices, and testing practices so you can translate digital designs into durable wearable art with confidence.
Designing for UV DTF: Resolution, Color Management, and Workflow
Design quality starts long before printing. For UV DTF Transfer, aim for high-resolution artwork—typically 300 dpi at the final print size—to preserve sharp edges and intricate line work. Work in a color space appropriate for printing (often CMYK) and anticipate color shifts that can occur when moving from screen to film to fabric. Planning color management early helps you minimize surprises when the design lands on the garment.
White underlays, layering, and careful separations are essential for turning bold concepts into wearable art on darker fabrics. Consider how the white space will read once transferred, and whether you’ll need white ink or a white underbase to preserve brightness. Test prints are invaluable for calibrating how colors translate through the UV DTF process, so you can adjust your workflow before committing to production runs.
Materials, Tools, and Setup for Consistent UV DTF Results
A balanced toolkit is the backbone of reliable UV DTF transfers. You’ll typically need a UV printing system or access to UV-curable inks, DTF film, and, if required by your film system, adhesive powder. A dependable heat press, silicone sheets, a craft knife, and a clean, dust-free workspace complete the core setup. For fabrics, choose cotton or cotton blends when possible to optimize adhesion and wash durability, while keeping an eye on fiber blends that may behave differently under heat.
Beyond the basics, protective sheets and fabric support help distribute pressure evenly and prevent ghosting or edge lifting. Design software for precise color separations, such as vector or raster tools, also matters, since clean vectors translate into crisper transfers. As you assemble your setup, document the manufacturer guidelines for your inks and film, because temperature, pressure, and dwell time all influence the final feel and durability of the wearable art you create.
Step-by-Step Process: From Design to Worn Garment with UV DTF
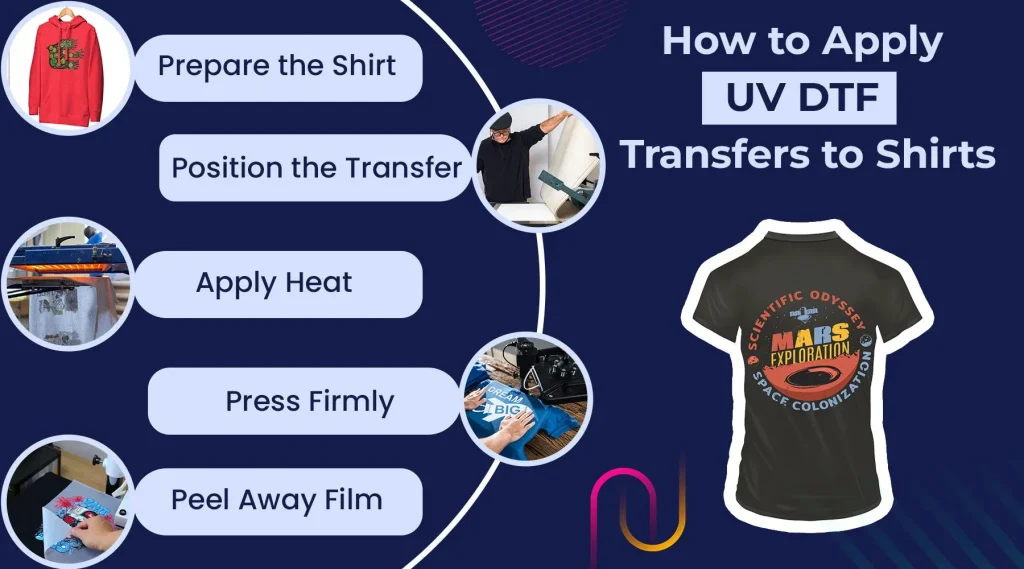
The workflow begins with finalizing your artwork in a scalable format and ensuring color separations are ready for printing. Print the design onto the DTF film using UV inks, checking alignment and overall print quality before proceeding. Immediately after printing, cure the ink with UV light according to the film and ink specifications to fix the image and prevent smudging.
Next, apply adhesive powder if required by your film, then pre-press the garment to remove moisture. Position the film on the fabric, protect with a sheet, and apply heat and pressure within the recommended parameters. After pressing, carefully peel the film while hot or cool, depending on your film’s instructions, and allow the garment to rest so the transfer fully sets. Finish with any post-care steps to maximize durability and wash performance.
Troubleshooting, Quality Control, and Durability in UV DTF Transfers
Even with careful preparation, issues can arise. Fading colors or dull results may indicate insufficient UV curing or gaps in color density that require adjusting the design’s color separations. Ghosting, ink bleed, or misalignment can occur if the film shifts during transfer or if pressure is uneven. Systematically auditing your steps—from pre-press to cure duration—helps identify where the breakdown occurred.
Durability hinges on proper curing, film compatibility, and fabric selection. White underbase opacity, proper post-press conditioning, and clear washing instructions all contribute to long-lasting results. Maintain a dust-free work area, store films properly, and document your process and test outcomes so you can iterate toward more consistent results across batches of wearable art.
UV DTF vs Other Methods: DTG, Heat Transfer Printing, and Traditional DTF
When deciding between methods, UV DTF stands out for its combination of fidelity and speed. Compared with DTG (Direct-to-Garment), UV DTF can produce sharp detail on a wide range of fabrics and often offers lower equipment costs for small runs. DTG embeds color directly into the fabric, which delivers an exceptionally soft hand but can be more sensitive to fabric choice and maintenance.
Traditional DTF without UV curing relies on different curing dynamics and can be more forgiving in some workflows, yet may require longer post-processing for wash durability. Heat transfer printing remains accessible and versatile, but the feel and durability are highly dependent on film, ink, and pressing parameters. By evaluating these options—DTG vs DTF, traditional DTF, and UV DTF—you can select the approach that best aligns with your project goals, budget, and desired wearability of the final art.
Frequently Asked Questions
What is DIY UV DTF Transfer and how does it differ from a standard DTF transfer?
DIY UV DTF Transfer is a hands‑on method that prints a design onto a UV‑curable film and transfers it to fabric with heat and pressure. It uses UV printing on fabric inks that cure under ultraviolet light, delivering sharper details and more vibrant color than traditional DTF. Compared with standard DTF, the UV version often provides crisper edges and a faster workflow for wearable art in small batches.
Can DIY UV DTF Transfer be used for wearable art on T-shirts and tote bags?
Yes. DIY UV DTF Transfer is well‑suited for wearable art on T‑shirts, tote bags, and other fabrics, especially cotton or blends. It can produce high color vibrancy and durable adhesion with a soft handfeel when you tune the transfer parameters. It’s ideal for hobbyists and small brands making limited runs.
What materials do I need to start a DIY UV DTF Transfer project?
Core materials include a UV printing setup or UV‑curable inks, DTF film, adhesive powder if required, a calibrated heat press, protective sheets, and clean fabric. Design software and a stable workspace are also essential. For best results, choose fabrics recommended by your ink/film manufacturers (often cotton or blends) and plan for color separations and testing.
What is the typical DIY workflow from design to wearable art using DIY UV DTF Transfer?
Design in vector or high‑resolution raster, print onto DTF film with UV inks, cure immediately with UV light, apply adhesive powder if needed, pre‑press the garment, position and press with heat and pressure, then peel and finish. Follow with appropriate post‑care to maximize durability. This workflow emphasizes the UV workflow and delivers sharp detail on fabric.
What are common issues with DIY UV DTF Transfer and how can I troubleshoot them?
Common issues include fading colors, peeling, ghosting, or white underbase showing through. Troubleshoot by verifying sufficient UV curing, checking ink density and color separations, ensuring proper alignment, adjusting dwell time and pressure, and confirming correct film and underbase usage.
How does DIY UV DTF Transfer compare to DTG and heat transfer printing (DTG vs DTF) for wearable art?
DTG prints embed color into fabric and offer a very soft hand, but require textile‑in‑k inks and can be costlier for small runs. DIY UV DTF Transfer can deliver sharper details with fast curing times and is often more economical for small batches. Traditional heat transfer printing is versatile, but results depend on film and ink quality; DIY UV DTF Transfer balances fidelity, durability, and cost for wearable art in many fabrics.
| Topic | Key Points |
|---|---|
| What it is |
|
| Benefits |
|
| Core Workflow Overview |
|
| Essential Materials & Tools |
|
| Design Considerations |
|
| Step-By-Step Process |
|
| Troubleshooting & Pro Tips |
|
| Creative Applications & Comparisons |
|
| Conclusion |
|
Summary
DIY UV DTF Transfer is a dynamic fusion of digital design and fabric art, enabling creators to turn concepts into vibrant, durable wearable pieces. This overview has highlighted the essentials from materials and design considerations to the step by step workflow and troubleshooting tips, showing how UV curable inks and Direct-to-Film enable sharp detail and lasting color on a range of fabrics. By testing on swatches, refining color management, and following proper heat press parameters, you can achieve studio quality transfers at home or in a small workshop. With patience and practice, your DIY UV DTF Transfer projects become reliable avenues for creative expression, limited editions, and personalized gifts that endure wear and washing.